Kubernetes Resource Requests and Limits: Why They Actually Matter
Understand Kubernetes resource requests vs limits, QoS classes, OOM kills, CPU throttling, VPA auto-tuning, and namespace quotas. The configuration that decides if your Pod lives or dies.
Infrastructure engineer with 10+ years building production systems on AWS, GCP,…
The Configuration That Decides If Your Pod Lives or Dies
Kubernetes resource requests and limits control how much CPU and memory your containers can use -- and more importantly, how the scheduler decides where to place them. Get these wrong and you'll face either wasted capacity (overprovisioned) or cascading OOM kills and CPU throttling (underprovisioned). Most production incidents I've debugged trace back to missing or misconfigured resource specs.
The distinction between requests and limits is subtle but critical. Requests are a guarantee; limits are a ceiling. Understanding this difference -- and the QoS classes that result -- is essential for running stable workloads at scale.
What Are Resource Requests and Limits?
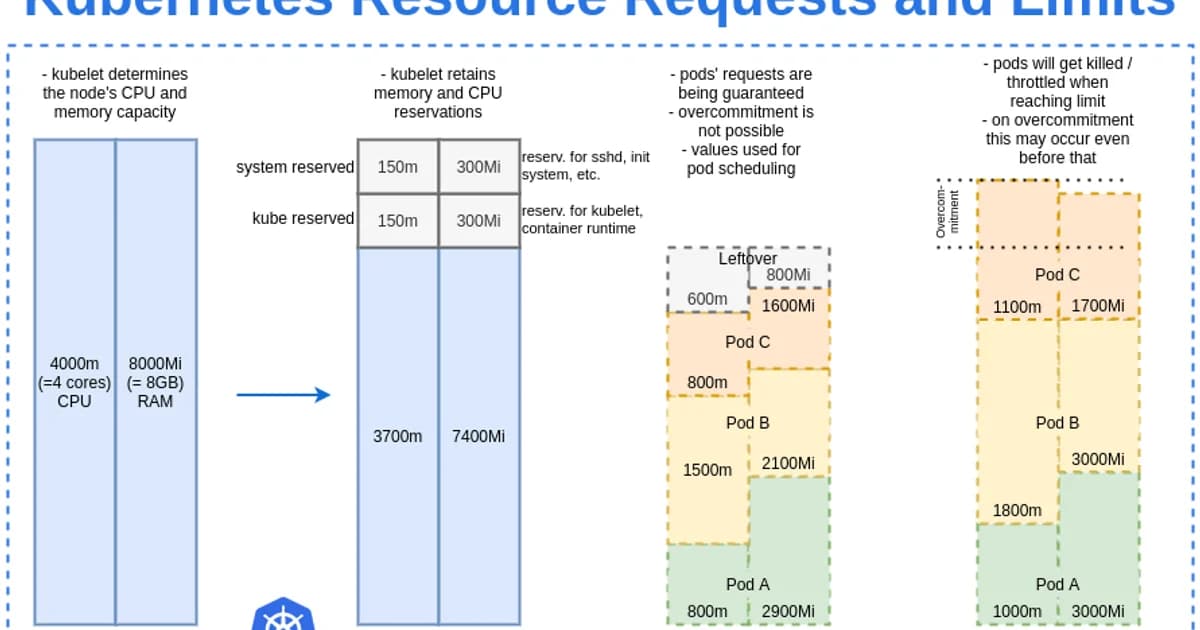
Definition: Resource requests are the minimum amount of CPU and memory guaranteed to a container. Resource limits are the maximum amount a container can consume. The Kubernetes scheduler uses requests to find a node with sufficient capacity; the kubelet enforces limits at runtime by throttling CPU or terminating the container if it exceeds memory limits.
Requests vs Limits: How They Work
| Aspect | Requests | Limits |
|---|---|---|
| Purpose | Scheduling guarantee | Runtime ceiling |
| CPU behavior | Reserved on node | Throttled if exceeded |
| Memory behavior | Reserved on node | OOM killed if exceeded |
| Scheduler uses it? | Yes | No |
| Enforced at runtime? | No (minimum guarantee) | Yes (hard ceiling) |
apiVersion: v1
kind: Pod
metadata:
  name: web-app
spec:
  containers:
  - name: app
    image: my-app:latest
    resources:
      requests:
        memory: "256Mi"
        cpu: "250m"    # 0.25 CPU cores
      limits:
        memory: "512Mi"
        cpu: "1000m"   # 1 CPU core
CPU Units Explained
CPU is measured in millicores. 1000m equals 1 full CPU core. 250m is a quarter core. You can also write 0.25 instead of 250m -- they're equivalent. One AWS vCPU, one GCP core, and one Azure vCPU all equal 1000m in Kubernetes.
Memory Units Explained
Memory uses binary units: Mi (mebibytes, 1024-based) and Gi (gibibytes). Don't confuse Mi with M (megabytes, 1000-based). The difference matters when you're close to limits -- 256Mi is 268 MB, not 256 MB.
How the Scheduler Uses Requests
- You submit a Pod with resource requests defined
- The scheduler scans all nodes and calculates available capacity (allocatable minus sum of existing requests)
- Nodes that can't fit the Pod's requests are filtered out
- Remaining nodes are scored based on factors like spreading, affinity, and resource balance
- The Pod is assigned to the highest-scoring node
- The node's "allocated" counter increases by the request amount, even if the container isn't using it yet
Watch out: If you don't set requests, the scheduler assumes your Pod needs zero resources. It will pack Pods onto nodes until something breaks. Always set requests based on actual measured usage -- they're the scheduler's only input for capacity planning.
QoS Classes: Guaranteed, Burstable, BestEffort
Kubernetes assigns a Quality of Service class to every Pod based on its resource configuration. This class determines which Pods get killed first when a node runs out of resources.
| QoS Class | Condition | OOM Kill Priority | Best For |
|---|---|---|---|
| Guaranteed | Requests == Limits for all containers | Last to be killed | Databases, stateful services |
| Burstable | At least one request set, requests != limits | Killed after BestEffort | Most application workloads |
| BestEffort | No requests or limits set | First to be killed | Batch jobs you don't care about |
# Guaranteed QoS: requests equal limits
resources:
  requests:
    memory: "512Mi"
    cpu: "500m"
  limits:
    memory: "512Mi"
    cpu: "500m"

# Burstable QoS: requests less than limits
resources:
  requests:
    memory: "256Mi"
    cpu: "250m"
  limits:
    memory: "512Mi"
    cpu: "1000m"

# BestEffort QoS: no resources specified
# (don't do this in production)
Pro tip: For databases and other stateful workloads, use Guaranteed QoS (requests == limits). You give up bursting ability, but the Pod becomes the last thing killed during node pressure. The predictability is worth the cost for data-critical services.
OOM Kills: What Happens When Memory Exceeds Limits
When a container tries to use more memory than its limit, the Linux kernel's OOM killer terminates the process. Kubernetes detects this and restarts the container according to the Pod's restartPolicy.
How to Diagnose OOM Kills
# Check for OOM kills
kubectl describe pod my-app | grep -A 5 "Last State"
# Look for: Reason: OOMKilled

# Check node-level memory pressure
kubectl describe node my-node | grep -A 5 "Conditions"
# Look for: MemoryPressure = True

# View container memory usage
kubectl top pod my-app
# Compare actual usage vs limits
Common OOM Kill Patterns
- Memory leak -- usage climbs steadily until it hits the limit. Fix the leak, don't raise the limit.
- Spike on startup -- JVM warmup, initial cache loading. Set limits high enough for the peak, not just steady state.
- Limit set too low -- legitimate usage exceeds the limit. Use
kubectl topand metrics-server to find the actual P99 usage, then set limits 20-30% above that.
CPU Throttling: The Silent Performance Killer
Unlike memory, exceeding CPU limits doesn't kill your container. Instead, the kernel throttles it -- your process is forced to wait, which increases latency. The insidious part: kubectl top shows CPU usage after throttling, so it looks like you're using exactly your limit when in reality you need more.
# Check for CPU throttling
kubectl exec my-app -- cat /sys/fs/cgroup/cpu.stat
# Look for: nr_throttled and throttled_usec
# Non-zero values mean your container is being throttled
Watch out: Many experienced Kubernetes operators recommend not setting CPU limits at all -- only CPU requests. CPU is compressible (throttling doesn't crash anything), and limits cause latency spikes during traffic bursts. Set requests to guarantee scheduling, but let CPU burst freely. Google's internal practices follow this approach.
Vertical Pod Autoscaler (VPA)
Manually tuning requests and limits for every workload doesn't scale. The Vertical Pod Autoscaler watches actual resource usage over time and recommends (or automatically applies) better values.
apiVersion: autoscaling.k8s.io/v1
kind: VerticalPodAutoscaler
metadata:
  name: web-app-vpa
spec:
  targetRef:
    apiVersion: apps/v1
    kind: Deployment
    name: web-app
  updatePolicy:
    updateMode: "Auto"  # or "Off" for recommendations only
  resourcePolicy:
    containerPolicies:
    - containerName: app
      minAllowed:
        cpu: 100m
        memory: 128Mi
      maxAllowed:
        cpu: 2000m
        memory: 2Gi
VPA Modes
- Off -- generates recommendations but doesn't apply them. Start here.
- Initial -- sets resources on Pod creation but doesn't update running Pods
- Auto -- evicts and recreates Pods with updated resources. Be careful with stateful workloads.
Namespace Resource Quotas
Resource quotas set hard limits at the namespace level, preventing any single team or environment from consuming all cluster resources.
apiVersion: v1
kind: ResourceQuota
metadata:
  name: team-a-quota
  namespace: team-a
spec:
  hard:
    requests.cpu: "10"
    requests.memory: 20Gi
    limits.cpu: "20"
    limits.memory: 40Gi
    pods: "50"
LimitRange: Setting Defaults
A LimitRange sets default requests and limits for containers in a namespace that don't specify their own. This prevents BestEffort Pods from being created accidentally.
apiVersion: v1
kind: LimitRange
metadata:
  name: default-limits
  namespace: team-a
spec:
  limits:
  - default:
      cpu: 500m
      memory: 256Mi
    defaultRequest:
      cpu: 100m
      memory: 128Mi
    type: Container
Pricing Impact: Right-Sizing Saves Real Money
Over-requesting resources directly wastes cloud spend. Under-requesting leads to instability and emergency scaling.
| Scenario (100 Pods on AWS EKS) | CPU Requested | Monthly Node Cost (m5.xlarge) |
|---|---|---|
| Over-provisioned (1 CPU / 2Gi per Pod) | 100 CPU | ~$4,800 (26 nodes) |
| Right-sized with VPA (250m / 512Mi per Pod) | 25 CPU | ~$1,200 (7 nodes) |
| Savings | 75% | ~$3,600/month |
Tools like Kubecost (free tier available) and the GKE cost optimization dashboard show per-workload cost and right-sizing recommendations.
Frequently Asked Questions
What happens if I don't set resource requests or limits?
Your Pod gets BestEffort QoS class, meaning it's the first to be evicted when a node runs low on resources. The scheduler treats it as needing zero resources, so it can be placed on any node regardless of available capacity. This leads to overcommitted nodes and unpredictable OOM kills. Always set at least requests.
Should I set CPU limits?
Controversial but increasingly: no. CPU is a compressible resource -- throttling causes latency but doesn't crash containers. Many teams, including Google's internal Borg practices, set CPU requests (for scheduling) but omit CPU limits (to allow bursting). Always set memory limits, though -- memory overuse causes OOM kills.
What is the difference between OOMKilled and Evicted?
OOMKilled means the container exceeded its memory limit and the Linux kernel killed the process. Evicted means the kubelet preemptively removed the Pod because the node was under resource pressure (memory, disk, or PIDs). OOMKilled is container-level; eviction is node-level. Both result in Pod restarts but have different root causes.
How do I find the right values for requests and limits?
Run your application under realistic load and monitor actual usage with kubectl top, Prometheus metrics, or VPA recommendations. Set requests to the P50 (median) usage and limits to 1.5-2x the P99 usage. Never guess -- always base values on observed data. Adjust after each load test or traffic pattern change.
Can VPA and HPA (Horizontal Pod Autoscaler) work together?
Not easily on the same metric. If VPA adjusts CPU requests while HPA scales based on CPU utilization, they'll fight each other. The recommended approach: use HPA for scaling replica count based on CPU/custom metrics, and VPA for tuning memory requests only (with CPU excluded from VPA's scope).
What happens when a node has no allocatable resources left?
New Pods that request resources beyond the node's allocatable capacity won't be scheduled there. If no node in the cluster can fit the Pod, it stays in Pending state. The Cluster Autoscaler (if enabled) detects unschedulable Pods and provisions new nodes. Without an autoscaler, the Pod waits indefinitely.
Conclusion
Set memory requests and limits on every container. Set CPU requests, but seriously consider omitting CPU limits unless you have a specific reason to cap throughput. Use VPA in "Off" mode to get right-sizing recommendations, then apply them. Add namespace quotas and LimitRanges to prevent runaway resource consumption. These configurations aren't optional -- they're the foundation of a stable, cost-efficient Kubernetes cluster.
Written by
Abhishek Patel
Infrastructure engineer with 10+ years building production systems on AWS, GCP, and bare metal. Writes practical guides on cloud architecture, containers, networking, and Linux for developers who want to understand how things actually work under the hood.
Related Articles
Multi-Cluster Kubernetes: Argo CD ApplicationSet Patterns
When 10+ clusters or 50+ services break hand-written GitOps. ApplicationSet's four generators (cluster list, Git directory, PR, cluster decision), real production patterns (env promotion, per-tenant, multi-region failover, preview envs), and the sharp edges (template debugging, cascading mistakes, RBAC).
11 min read
ContainersKubernetes GPU Scheduling: DRA, KAI Scheduler, MIG
Dynamic Resource Allocation replaced device plugins for GPU claims in Kubernetes 1.34. KAI Scheduler adds gang scheduling and queues. MIG slices H100s into 7 isolated tenants. Full production setup with the NVIDIA GPU Operator, topology-aware training, and when to use MIG vs MPS vs time-slicing.
17 min read
CI/CDProgressive Delivery with Argo Rollouts: Canary + Analysis
Argo Rollouts replaces Kubernetes Deployments with a CRD that does weighted canary, metric-gated analysis, and automatic rollback. Production recipe, Prometheus AnalysisTemplates, and a side-by-side with Flagger.
15 min read
Enjoyed this article?
Get more like this in your inbox. No spam, unsubscribe anytime.